Software:
1. Create a spreadsheet document in Google Drive
2. Create an application on Google App engine
3. Accessing Spreadsheet API by using Google App Script
4. Since Arduino can’t handle https, we will have to use Pushing box API as ‘GET request’ link from Arduino to run that Google Script.
5. Add scenario and services in Pushing Box
Hardware:
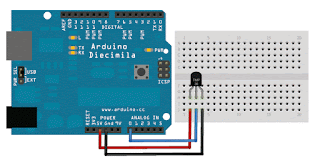
1. Set up Arduino, Ethernet shield, and LM35
2. Modify your code [IP address, pushing box device id, etc.]
3. Burn your code.
Final:
Make application interface in your app spot cloud.
Procedure:
1. Create a Spreadsheet at Google Drive, Rename it as Temperature Data.
2. Make the first column as Timestamp second column as Temperature Value.
3. Go to Google App Engine Console and create an application.
3. Go to Google App Engine Console and create an application.
4. Go to Google drive, Google App script and create a blank Project. Paste the below code
/*
GET request
query:
https://script.google.com/macros/s/<gscript
id>/exec?tempData=data_here
*/
/* Using
spreadsheet API */
function doGet(e)
{
Logger.log(
JSON.stringify(e) ); // view parameters
var result =
'Ok'; // assume success
if (e.parameter
== undefined) {
result = 'No
Parameters';
}
else {
var id =
'<put your Spreadsheet ID here>'; // Spreadsheet ID
var sheet =
SpreadsheetApp.openById(id).getActiveSheet();
var newRow =
sheet.getLastRow() + 1;
var rowData =
[];
//var waktu =
new Date();
rowData[0] =
new Date(); // Timestamp in column A
for (var
param in e.parameter) {
Logger.log('In
for loop, param='+param);
var value =
stripQuotes(e.parameter[param]);
//Logger.log(param + ':' + e.parameter[param]);
switch
(param) {
case
'tempData': //Parameter
rowData[1]
= value; //Value in column B
break;
// case
'column_C':
//
rowData[2] = value;
// break;
default:
result
= "unsupported parameter";
}
}
Logger.log(JSON.stringify(rowData));
// Write new
row below
var newRange
= sheet.getRange(newRow, 1, 1, rowData.length);
newRange.setValues([rowData]);
}
// Return result
of operation
return
ContentService.createTextOutput(result);
}
/**
* Remove leading
and trailing single or double quotes
*/
function
stripQuotes( value ) {
return
value.replace(/^["']|['"]$/g, "");
}
In the above code, there is a spreadsheet id and we have to type it, so get the spreadsheet id, which we created in the first step. The spreadsheet can be copied from the URL only, it lies in between d/ and /edit of the spreadsheet link.
5. Paste the spreadsheet id and save it.
6. Again click on “Deploy on web app” in Google app script page. Give project version as 1 and execute the app as “User accessing the web app” and even you can change the permission also, make it for everyone, the anonymous user can access it. And copy the current web app URL and execute it in a browser, it asks you for authentication. Once the authentication is done successfully, it should you OK in the web page.
Execute the below query in the browser , you should get OK as the response.
GET request query:
https://script.google.com/macros/s/<gscript id>/exec?tempData=data_here
Final URL for my application - https://script.google.com/macros/s/AKfycbxkgVZosjV-NgSpLFM2HSfTX4z9hThJNfPtIqAhuk1IHKR8lfW9/exec?tempData=data_here
Where tempData – is the parameter and data_here are the value in that column
7. Now go to pushingbox.com and log in with Google.
8. Go to My Services, click on add service and choose Custom URL Service
And give Name of your custom URL configuration as Online Temperature Monitoring
And Root URL should be copied from Google app script project, and paste it in Root URL
9. Click on Submit after the above steps.
10. Click on My Scenarios, and type Online Thermometer in the input box of Configuration and click on Add button
11. Click on add action.
12. Again click on Add an action with the service associated with Online Temperature Monitoring.
And in place of Data input Box, write this ?tempData=$tempData$ and click on submit.
Now you can access this pushing box API by sending GET request link this:
http://api.pushingbox.com/pushingbox?devid=<place your device id here>&tempData=data_here
for my application
The above query should insert data_here in tempData column of Google Spreadsheet
Yes we made it
Now we can make Arduino make GET Request to the link above.
13. Burn the below program on your Arduino UNO device using their Arduino IDE.
/*
Since Arduino can't handle https, we need to use Pushingbox API (uses http) to run the Google Script (uses https).
*/
#include <SPI.h>
#include <Ethernet.h>
//-------------------------------------------------------------------------------
byte mac[] = { 0xDE, 0xAD, 0xBE, 0xEF, 0xFE, 0xED }; //Setting MAC Address
char server[] = "api.pushingbox.com"; //pushingbox API server
IPAddress ip(192,168,1,2); //Arduino IP address. Only used when DHCP is turned off.
EthernetClient client; //define 'client' as object
String data; //GET query with data
float suhu; //suhu (bahasa Indonesia) means temperature
boolean koneksi = false;
//------------------------------------------------------------------------------
void setup() {
Serial.begin(9600);
if (Ethernet.begin(mac) == 0) {
Serial.println("Failed to configure Ethernet using DHCP");
Ethernet.begin(mac, ip);
}
delay(1000);
}
//------------------------------------------------------------------------------
void loop(){
int baca_ADC = analogRead(7); //read analog input on pin A7
suhu = baca_ADC * 5.0 * 100.0/1024.0; // ADC to celcius conversion
kemasData(); //packing GET query with data
Serial.println("connecting...");
if (client.connect(server, 80)) {
sendData();
koneksi = true; //connected = true
}
else{
Serial.println("connection failed");
}
// loop
while(koneksi){
if (client.available()) {
char c = client.read(); //save http header to c
Serial.print(c); //print http header to serial monitor
}
if (!client.connected()) {
Serial.println();
Serial.println("disconnecting.");
Serial.print("Temperature Sent :");
Serial.println(suhu); //print sent value to serial monitor
client.stop();
koneksi = false;
data = ""; //data reset
}
}
delay(5000); // interval
}
void kemasData(){
data+="";
data+="GET /pushingbox?devid=v42AC6A698B9E39D&tempData="; //GET request query to pushingbox API
data+=suhu;
data+=" HTTP/1.1";
}
void sendData(){
Serial.println("connected");
client.println(data);
client.println("Host: api.pushingbox.com");
client.println("Connection: close");
client.println();
}

I had followed all you steps but when accessing push box api by get request link i could only notice the time stamp column has been updated but the column b is not being updated .Please help me
ReplyDelete